The Terminal
I'm sure you have seen TV shows and movies in which a super awesome programmer saves the world by widely typing commands into the computer (or a super villain tries to destroy the world by typing deadly commands). It might look like magic but it is actually not that hard; you don't have to be a genius to learn it. This page will explain the basics of using a terminal and what you can do with it. Don't Panic! It'll be aright.
Disclaimer
We're are not Windows people, which means we have some basic knowledge with Windows and we will try our best to explain the following for Linux, Mac OSX, and Windows, but some things might be missing or slightly different for Windows. Also, all of the screenshots will be for Mac (which is almost the same as for Linux), and most of our output examples. We apologize for that. If you find an error in our explanations, or have a suggestion to make it better, please let us know. If you want an article completely focused on Windows, you can take a look at for instance this webpage: http://www.computerhope.com/issues/chusedos.htm.
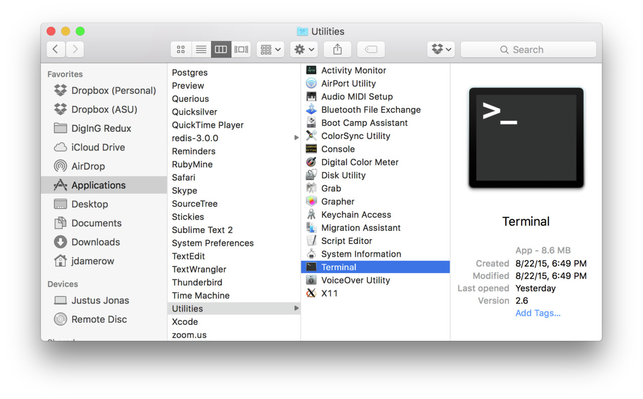
If you have Linux operating system, you will be already pretty familiar with a terminal window (and we're assuming you know how to open a new one). If you are on a Mac or a Window, then you might or might not have seen it. o open a new terminal window on Mac, go to your "Applications" folder and then to the "Utilities" folder. Double-click on "Terminal".
On a Windows computer, you can click the Start button, click "All Programs", click "Accessories", and then click "Command Prompt". Or you can click the Start button and then in the Search box, type "cmd". From the list of results, double-click "Command Prompt".
Setup
If you want to try out the examples given in this article, using the Finder, create a folder called "test" on your desktop. Create another folder called "subfolder" inside the folder "test". Then, using a text editor, create a file called "file.txt" inside the folder "test". Your folder structure starting at your desktop would look like this:
desktop
test
subfolder
file.txt
Navigating the File System
The file system of you computer is build up like a tree. You have a root directory that contains all your other directories and files. On a Unix-based operating system (such as Linux and Mac OSX), if you have several hard drives or a USB stick attached to your computer, they are typically attached to a specific folder in your file system. On Windows machines, different hard-drives are mounted in parallel to your computer's main hard-drive (C:).
On a Unix-based OS, your root directory is "/". On Windows, you would select what hard-drive you want to look at by using its name (e.g. "C:\"). To tell your computer about a specific folder or file you specify its path from the root directory (there are other ways, but for now let's go with this). For example, on a Mac, you home folder would have the path "/Users/your-user-name"; on a Windows computer, it would be "C:\Users\your-user-name".
Note
Unix-based systems use forward slashes "/", while Windows uses backward slashes "\".
So let's walk around in our file system a little bit. You know how you can move from one folder to another in your Finder or Explorer? You can do the same thing in a terminal, but instead of clicking you type where you want to go. And instead of automatically seeing what a folder contains, you have to type a command to tell the terminal to show you the content of a directory. Let's go!
ls
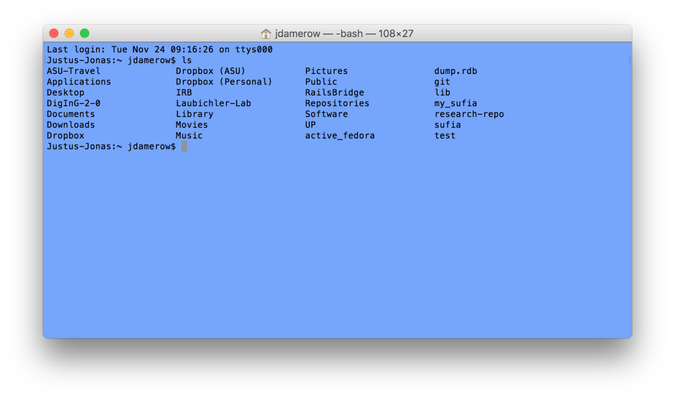
The first command you need is ls, which stands for list (files/folders). Simply type ls into your terminal window. If you're on a Windows computer, type dir instead. You should see an output similar to this one:
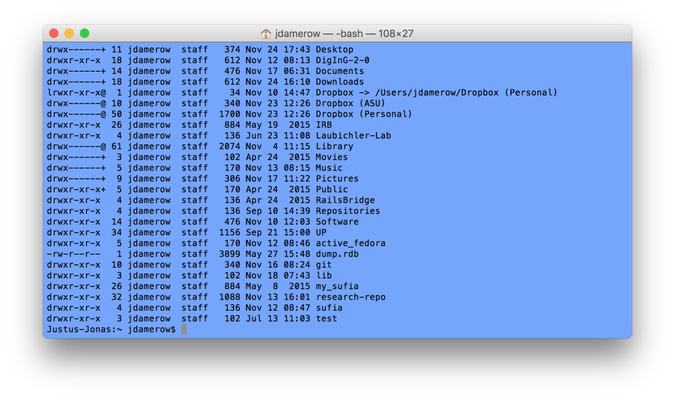
By default, when you open a new terminal window, you will be in your home directory. Hence, you should see a list of all the files and folders in your home directory. You should see something similar on a Windows machine, just with a different layout with some more information such as the creation date and time. You can get a similar output on Mac by typing ls -l. You should something like this:
The output might look intimidating and like gibberish at first, but it's actually not. Let's take a closer look. The first column tells you several things:
- If the first character is a "d", the file is a directory. If it is a hyphen ("-"), it is a file. For example, we can see that the first row in the screenshot represents a folder (called "Desktop"). If the first character is an "l", the file is a link, and simply points to another file in the file system.
- The next three characters tell you what rights the owner of the file has: read ("r"), write ("w"), or execute ("x"). If there is a hyphen instead of a character, the owner doesn't have that right. For example, the first row in the screenshot, says that the owner of the folder can read, write, and execute the file. Since the file is a folder (line starts with a "d"), executing means opening or looking into the folder.
- The following three characters (position 5-7), represent what rights the group the file belongs has (we'll talking about groups in a little bit). This works the same way as defining the rights for the owner of the file: read ("r"), write ("w"), or execute ("x"). In the above example, the group of the user can neither read, write, or execute the Desktop folder.
- The last three characters define the rights everybody has on the file. E.g. if other users have an account on your computer, they can read that file if "r" is set.
Let's skip the "@" or "+" signs and the number after the permission for now. The next column will show you who the owner of a file is. In the above example, it is the user "jdamerow" for all the files in that folder (which makes sense, because it is Julia's desktop we're seeing right now). The next column shows the group the file belongs to. Most operating systems let you create user groups. By using groups, you can for example give several people certain rights at once, such as giving them write access to a particular folder, or allow them to execute a specific file. In our example above, all the files we see belong to the group "staff", which means that all users that are in the group "staff" have the permissions defined by characters 5-7 in each line for the corresponding files.
The next column shows the size of a file and its last modification date/time. At the end, you see the name of the files and folders in that director. To summarize:
drwx------+ 15 jdamerow staff 510 Nov 25 12:51 Desktop
This line means that there is a folder (line starts with a "d") "Desktop" that belongs to the user "jdamerow" and the group "staff". However, while jdamerow can read, write, and execute the folder ("rwx"), the group "staff" doesn't have any rights on it ("—" at position 5-7). Every other user (not jdamerow, and not in group "staff") doesn't have any rights either ("—" at postion 8-10).
cd
Now that you know how to see the contents of a folder, let's move around. The command cd (change directory), let's you change the directory you're currently in. You use it by typing cd followed by the folder you want to go to. For example, typing
cd /Users/jdamerow/Desktop/test
will move you into the folder "test", which is inside the folder "Desktop" of the user "jdamerow". If you want to try this out yourself, adjust the path in the example by replace "jdamerow" with your username.
Now, you might say "why do I have to give the whole path to the folder when I'm already in the Desktop folder?". A very valid question! And "you don't have to" is the answer. You can use something called "relative paths" instead. A relative path assumes your current folder as the starting point and you simply say how to get to the folder/file you need from your current position (it's like saying "make a right on the next corner", instead of "when you come into the city from the north, go straight till you see the city hall, then make a left, etc. etc."). Using a relative path in the above example, you can simply type:
cd Desktop/test
Note
If you executed the first command that uses the absolute path to the test folder, you first need to go back to your home directory. You can always go back to your home directory from anywhere by typing:
cd ~
or simply cd (in Unix-base systems).
If you want to move into a folder that is above you in the file system tree, for example, you want to move into the folder "Desktop" but you are in "test", you can type
cd ..
The two dots (..) denote a parent folder. In contrast one dot (.) refers to the current folder. This means that typing
ls .
should give you the same output as just typing ls.
Exercise
Try walking around in your file system a bit. Use ls and cd to go to your home directory and from there list its contents and go in a subfolder and a subfolder of a subfolder. Then go back to your home directory.
Tip
You can use the "tab" key on your keyboard to autocomplete file names. Simply start typing what you are looking for (for example "De") and hit the tab key. The terminal will autocomplete the folder name to "Desktop". If there are several folder/files that start with "De" hitting tab once might not say anything. In that case hit "tab" twice and the terminal will show you all files/folders that start with "De". Type another character or two (so that the command says cd Desk) and hit "tab". If the nothing happens even if you hit "tab" 2 or 3 times, it means that there are no files starting with "De".
mv
Now, that you know how to walk around in your file system, let interact with it. Anything you can do in a finder, you can do in the terminal as well (and more). Let's start with moving files around. The command for that is mv followed by the file you want to move and where you want to move it to:
mv file new_location
For example, if you want to move the file "file.txt" in the test folder into the folder "subfolder", you can write:
cd ~/Desktop/test # making sure you are in folder "test"
mv file.txt subfolder # move file.txt into subfolder
and to move it back again:
mv subfolder/file.txt . # moves the file file.txt from subfolder to the current directory (.)
You can also use mv to rename files. For example, to rename file.txt to file1.txt, type the following:
mv file.txt file1.txt
You can combine both actions moving and renaming by specifying a new filename while moving:
mv file1.txt subfolder/file.txt # moves file1.txt to subfolder and also renaming it to file.txt
cp
Besides moving and renaming files, you can also copy them. This is done by the command cp. Simply provide the file that you want to copy and the name (and location) of the new file. For example, let's copy file.txt (which, if you followed the previous examples, is now in subfolder) into our test folder:
cp subfolder/file.txt file_cp.txt # copies file.txt to a new file called file_cp.txt
cp file_cp.txt ../file_cp.txt # copies the file created in the last line onto the desktop
If you want to copy a folder, you need to provide the -r option (for recursive) that copies a folder and all its contents recursively:
cp -r subfolder subfolder2 # copies subfolder with all its contents to a new folder folder2
Exercise
Try the following: copy a file randomly selected from your computer (that is not on the desktop but preferably in a different subfolder of you home directory) into your test folder.
rm
Of course, you can also remove files through the terminal. The command for that is rm. To remove a file, simply type rm filename:
rm file_cp.txt # removes the file file_cp.txt in the current folder
cp subfolder/file.txt file_cp2.txt # copies file.txt to a new file called file_cp2.txt
If you want to remove a directory, you can use the same command but have to specify the option -r (for recursive) similar to the copy command. This tells the terminal to recursively delete the contents of a folder and then delete it.
rm -r subfolder2
mkdir
Last but not least, let's take a look at the command mkdir (make directory). You can use that to create new folders. For example, if you want to create a new folder called "mysub" into your test folder run:
# make sure you're in test: cd ~/Desktop/test
mkdir mysub
Where to go from here...
This is just a glimpse of what you can do with a terminal. There are several more commands and options for each command not covered here. You can simply google whatever you want to do on the terminal and there will be pages explaining that. A few places to go from here (most cover the basics we talked about but might go into more detail):
- 4 parts tutorial getting among other things into more detail regarding permissions: https://www.digitalocean.com/community/tutorials/an-introduction-to-the-linux-terminal
- Very Linux heavy terminal introduction, but most of it applies to OSX as well: http://linuxcommand.org/
- Linux geared tutorial that goes beyond the basics and into some more advanced topics: http://ryanstutorials.net/linuxtutorial/
- Basic tutorial for the Windows command prompt: http://www.cs.princeton.edu/courses/archive/spr05/cos126/cmd-prompt.html


